Create a 2D game with WoofJS
2D Game Design with WoofJS
WoofJS is a free web-based app for coding 2D games with the JavaScript programming language. Inspired by Scratch, it makes for a great transition from block-based coding to writing code in a text-based programming language like JavaScript. By learning how to build your own game in WoofJS, you will develop an understanding of the JavaScript coding language and programming logic, and develop a range of practical skills that you can apply to different projects. JavaScript is a great language to learn - not only can JavaScript be used to build games, it can also be used to develop websites and apps.
In this lesson, you will learn how to code your first 2D game in the JavaScript programming language using WoofJS! To get started, go to www.woofjs.com and click Start Coding to create a free account and start building your own games.
The first game we will make is a 2D game where the player moves around using the keyboard to catch as many enemies as they can within a time limit.
Tip: You can use the free sample sprites and backdrops to get started.

Video tutorials
To build this game in WoofJS, follow the tutorial videos below or scroll down the page for step-by-step written instructions.
The videos below are hosted on YouTube. If you’re at a school and YouTube is blocked, you can watch the videos on Google Drive.
Step-by-step instructions
Step 1
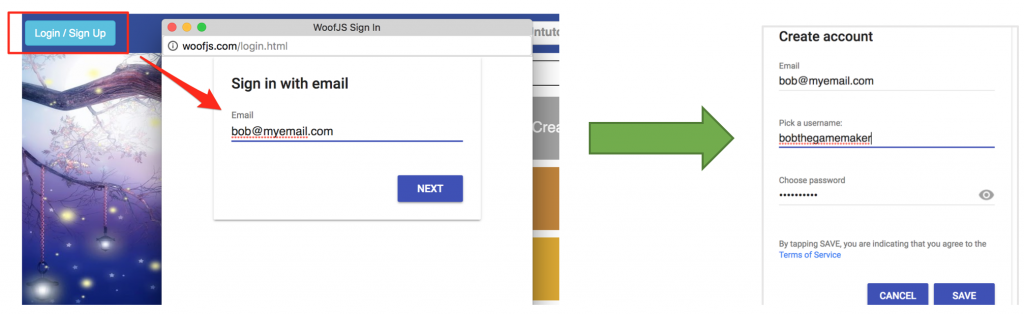
Make sure you create your free account so you can save your games to your profile. Click on Login / Sign up and then provide your email address. On the next screen, choose a password.
Step 2
Once you have created your account and logged in, click on your account name in the top left corner and then click New Project.

Step 3
A new empty project will open. Click on Save in the top right corner. Make sure you save your work regularly while you are coding.

Then give your project a name and click OK.

This is what the WoofJS window looks like…

Step 4
As you can see in the image above, there is already one line of code there. This line of code is used to specify the background for the game (or at least this part of the game – you might have many different levels and menus in your game, but let’s just start with one level). setBackdropURL() is a function that takes a link (also known as URL, or Uniform Resource Locator) to an image (such as a GIF, PNG or JPG file) and uses that image for the background or backdrop.
The link goes inside brackets and single quotes (you can use single or double quotes but they must be matching). Add the following code using a link to an image file you’d like to use as your background (you can click Sprites & Backgrounds > Images to upload your own image and generate a link to it, use one of WoofJS’ existing images, or use a link to another image on another website).
Here are some sample images you can use:
More free sample sprites and backdrops can be found here.
Tip: You can create your own game sprites (backgrounds, characters and other objects) at piskellapp.com and use those sprites in your WoofJS game.
So now we have a nice grass backdrop for the game. The game can be played in full screen but at the moment we can just see a preview of it on the left side of the screen.

Step 5
Now that we have a backdrop, we can add our first character to the game which will be the player. We can use an image sprite for the player too so we will need to specify the image to use for the player before we can specify its width, height, position, etc.
Add the following line of code to specify the image sprite to use for the player. Copy and paste the link to an image you’d like to use between the quotation marks, or click Sprites & Backgrounds > Background to choose an existing background image. You can also click Sprites & Backgrounds > Image to upload your own image.
You have just used the var keyword to create a variable. A variable is like a container that is used to store some information. Variables can store numbers or text among other things. We use the var keyword and then specify the name of the variable – this variable’s name is playerImage and will store the link to the image which we will use for the character. Variable names can’t contain spaces and must begin with a lowercase letter – these are part of the rules of the JavaScript language.
There are rules that you must follow in a programming language such as ending a statement/line with a semi-colon, using certain brackets, and correctly spelling keywords used in a language, for example, var and if. These rules are known as the programming language syntax. Because the image link is stored in a variable, whenever we want to use the image we just have to refer to the variable by its name rather than having to type in the long link every single time.
Step 6
At this point, you should have a backdrop and specified the image for the player’s character in the game. You won’t be able to see the player sprite yet because we haven’t specified how big it should be and where it should be placed on the screen. To do that, you need to add the following code:
In the code above, we create a variable called player and use the image from the playerImage variable to represent the player character. We then specify the width and height of the player. Lastly, we specify the x and y position of the player on the screen (x is horizontal axis across screen, y is vertical axis). Hint: x: 0, y: 0 is the centre of the screen.
This is what you should now see on your screen:

Step 7
Now that we have the player in your game, we can add an enemy to chase after (a not-so-scary monster). We will first specify the image sprite to use for the enemy and then we will create the enemy object in the game specifying its sprite url, width, height, and initial position on the screen (x and y axes). We will make the x position of the enemy 60 so that it is next to the player (and not on top of it). To do this, add the following code:
This is what your game should now look like with the player and enemy next to each other in front of a grass backdrop:

Step 8
The next step is to make the player move! To do this, we need to check which keys on the keyboard are being pressed. We can use the up and down arrows on the keyboard to move the player up and down. We can also use the left and right keys on the keyboard to move the player left and right. Rather than just checking if a key has been pressed, we can check if keys are currently being pressed.
We can use a forever loop to keep checking if keys are being pressed. We can also use includes to check if multiple keys are being pressed at the same time instead of just checking one key at a time.
Create a forever loop and inside that forever loop you can add if statements that check if a key is being pressed and then move the player on the x or y axis in the direction according to the key that is being pressed.
A positive number on the x axis moves the player right and on the y axis moves the player up.
A negative number on the x axis moves the player left and on the y axis moves the player down.

Here is the code you need to add which will make the player move 5 spaces in the direction of the arrow key that is pressed on the keyboard:
Your code and game should now look like this. If you click in the game preview window you can use the left, right, up, and down keys to move your character around!

Tip: You can find different pieces of code to use for movement by clicking on Motion. You can use different pieces of code for control (eg. check if a condition is true, or repeat instructions) by clicking on Control. You can also find the code for checking keypresses by clicking on Sensing.
Step 9
Now that we have a player and an enemy, we will need to allow them to interact. The aim of this game will be to catch as many enemies as possible in 20 seconds. When you catch an enemy another one will appear in a random location. A timer counts down from 20 seconds and the score is counted and displayed on-screen.
Before we allow the player to catch an enemy, we will add text on the screen to display the score, countdown timer, ‘Game over’ message, and ‘Press P to play again’ message that displays at the end of the game.
To add text on the screen, you need to create a variable that will store the different text properties including the actual text displayed, font size, colour, font family, alignment, and x and positions on the screen.
Add the following code between the code you added to create the enemy sprite and the start of the forever loop:
Your game should now look like this:

Step 10
Now we need to set the score to be 0 at the beginning of the game and set the timer to 20 at the beginning of the game (as the counter will count down from 20 to 0 seconds). Create a new variable called score and give it a value of 0. Then create a variable called time and give it a value of 0. We also don’t want the ‘Game over’ message or ‘Press P to play again’ message to display until after the game ends, so we will set these text objects to be hidden using the .hide() function. To do this, add the following code after the code you just added for the on-screen text:
After adding this code, you should now see that the ‘Game over’ and ‘Press P to play again’ text.

Step 11
Next, we can add the countdown timer functionality. We can use the every function to specify that every 1 second during the game we want the time variable to go down by 1 (the time variable will start at 20 at the beginning of the game and go down by 1 until it reaches 0 and the game ends). Every second the timer will also be updated on screen.
We can add the code if(time !== 0) so the timer won’t under 0 (into negative). !== is an a example of a comparison operator which means “is not equal to”. In other words, the game will only keep counting down if there is time left and once the time variable becomes 0 it will stop counting down. To implement the countdown timer, add the following code after the code that was just added in the previous step:
Once you have added this code you should see the timer start to count down and then stop once it reaches 0. This is what the game and code should look like so far:

To make comparisons, use the following relational operators:
!== means “is not equal to”
== means “is equal to”
< means “is less than”
> means “is greater than”
<= means “is less than or equal to”
>= means “is greater than or equal to”
You can also use the logical operators && (which means “and”) and || (which means “or”) to combine conditions, for example, if(score > 10 && score < 20) means “if score is greater than 10 and score is also less than 20”.
Step 12
Now that we have a working countdown timer we can go ahead and add the ability to score points and make the enemy respawn in random locations on the screen.
Every time the player touches the enemy, the score variable will increase by 1 and the score text will be updated on the screen. The enemy will then be moved to a random x and y position on the screen. minX is the minimum x position on the screen (left edge of the screen) and maxX is the maximum x position on the screen (right edge of the screen). minY is the minimum y position on the screen (bottom edge of the screen) and maxY is the maximum y position on the screen (top edge of the screen).
The enemy will respawn in random positions between those points. Note that in the code below we have the line enemy.y = random(minY, maxY – 30) which will place the enemy at a random y position on the screen but 30 spaces below the top of the screen. This ensures that the enemy doesn’t respawn behind the score or time remaining text.
Add the following code inside the forever loop just below the code we added to make the player move using the arrow keys:
After adding this code as shown below, you will be able to collect points every time you catch the enemy. You can also improve this code by making sure the enemy doesn’t respawn too close to the edge of the screen where it might be partially hidden. You could also randomly respawn the player for extra challenge.

Step 13
Once the time has reached 0 we won’t want the player to keep moving around and collecting more points (they will have to start a new game). So we can say that if(time === 0) (which means “if time is equal to 0”), set the player and enemy sprites to be hidden and show the ‘Game over’ text and ‘Press P to play again’ text on the screen. Add the following code after the code you added in the previous step (inside the forever loop).

Step 14
Lastly, we can check if the P key has been pressed on the keyboard and if so, set the score back to 0 and timer back to 20, show the player and enemy sprites on screen, reset the timer and score text on screen, and hide the ‘Game over’ and ‘Press P to play again’ text on the screen. Add the following code inside the forever loop just below the code added in the previous step:

And that’s it! You have just completed building your first game in WoofJS using JavaScript code. Make sure you click on Save to keep your work. You can share the code to your game by copying the link in the address bar, or to share the game ready for full-screen play, click the ‘Open in new tab’ button above the game preview panel to open the game in a new full-screen tab or window. Then share copy and share the link in the address bar.
Complete code
Here is the complete code for this game project. You can copy this code into WoofJS - just make sure to change the links for the player and enemy images/sprites. Copy and paste links to your own images, or upload your own images to WoofJS and then use the generated links.
Tips
If you receive error messages or your code isn’t working, make sure you have closed brackets and closed quotation marks where necessary (or don’t have too many brackets or quotes), and make sure the brackets and quotes are matching
Check for spelling mistakes and make sure you refer to variable names exactly as they were created. Variable names are case-sensitive eg. playerOne and playerone would be treated as two separate variables.
Save frequently so you don’t lose your hard work if the Internet connection drops out or your computer crashes
Look at all the different blocks for different pieces of code you can use – experiment with code and work out different ways of solving problems – it’s the best way to learn coding!
What next?
You could try adding a feature to your game that allows it to save high scores. You could also add hazards to avoid, make the player respawn in random locations, or make the enemy move around. Also, try improving the appearance of text on the screen by changing font family/style.
Review questions
1. What do the following key terms mean? Can you give an example for each?
Syntax
Variable
Conditional statement
Loop
Function
URL (Unform Resource Locator)
2. What is the JavaScript programming language used for? Provide three examples of apps or games you can find that have been built using the JavaScript language.
3. Three types of errors you might encounter when coding are
syntax errors,
logic errors, and
runtime errors.
Explain the meaning of these errors and the differences between these three different types of errors. Provide examples of each.