Control a servo motor with an Arduino
Arduino Uno tutorials
🕑 This lesson will take about 10 minutes
Servo motors are motors that can be used to rotate parts of machines with precision. Small servo motors can be directly connected to an Arduino microcontroller board to control the position of the shaft which is usually fitted with a gear. A servo motor uses feedback to determine the position of the shaft and precisely control its movement. Different shaped arms can be attached to the shaft to control different types of objects. The arm attached to a servo motor can rotate up to 180 degrees back and forth.
Servo motors can be used to:
rotate joints on a robot’s arms, legs, wrists or hands
make an ultrasonic sensor scan left and right
open and close gates, doors or latches
and much more.
They can be used in small applications such as controlling the rudder of a radio-controlled model aircraft, to large robots and in-line manufacturing.
Servo motors have the following three wires:
Ground (usually brown/black)
5V power (usually red)
PWM (pulse width modulation) wire (usually orange)
Required parts
1 x Arduino Uno board
1 x servo motor
3 x male-to-male jumper wires
Wiring schematic
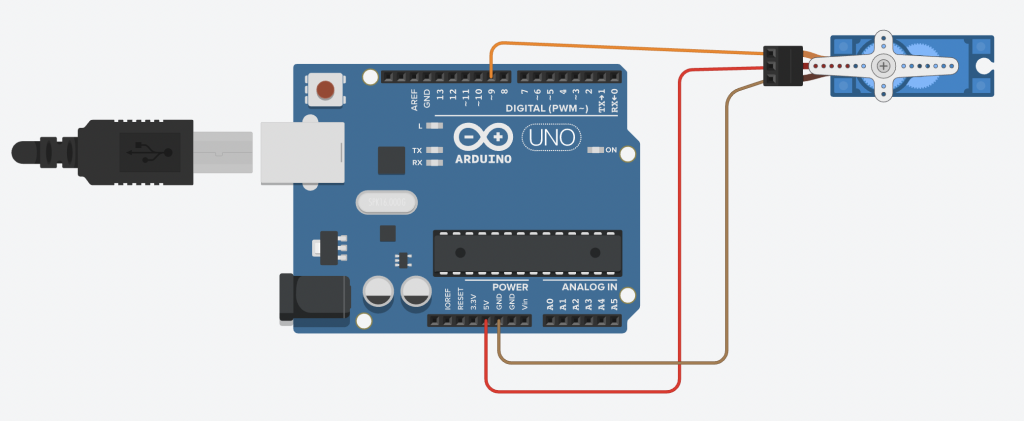
Connect the brown ground (GND) wire from the servo motor to an available GND slot on the Arduino board.
Connect the middle red power wire to 5V on the Arduino board.
Connect the orange PWM wire to one of the PWM slots on the Arduino (any digital pin slot with a ~ next to it), eg. pin ~9.
The servo motor can be connected directly to the Arduino (you may need to use male-to-male jumper wires) or via a breadboard.
The code
Example 1 - rotate the servo motor arm to a specific angle
In this example, the servo motor arm will rotate to 90 degrees and stay there. Copy this code to a new sketch file using the Arduino IDE software. Save the code and upload to your Arduino board.
Example 2 - rotate the servo motor arm back and forth (180 degrees)
In this example, the servo motor arm will rotate from 0 to 180 degrees, and then from 180 degrees back to 0 degrees. This will repeat over and over again, rotating the arm back and forth 180 degrees. Two for loops are used - the first for loop is responsible for rotating the arm from 0 to 180 degrees, rotating by 5 degrees in each iteration of the loop. Once this loop ends, the second for loop rotates the arm from 180 degrees back to 0 degrees, rotating by 5 degrees in each iteration of the loop. There is also a delay of 15 milliseconds between each movement. As both of these for loops, are within the loop function, all of this code will repeat without stopping.
Copy this code to a new sketch file using the Arduino IDE software. Save the code and upload to your Arduino board.

