Control an LED with a smartphone app via Bluetooth using an Arduino
Arduino Uno tutorials
🕑 This lesson will take about 20 minutes
In this lesson, you will learn how to control an LED light connected to an Arduino using a smartphone app and a Bluetooth connection. This tutorial involves using the HM-10 BLE Bluetooth 4.0 module and an iOS app for iPhone, however you can also get this to work with an Android app. We will use a free app for testing the Bluetooth connection, however there are a range of apps available for communicating with an Arduino via Bluetooth and you can even make your own app.
This is what the HM-10 Bluetooth module looks like…

HM-10 Bluetooth module (top side)
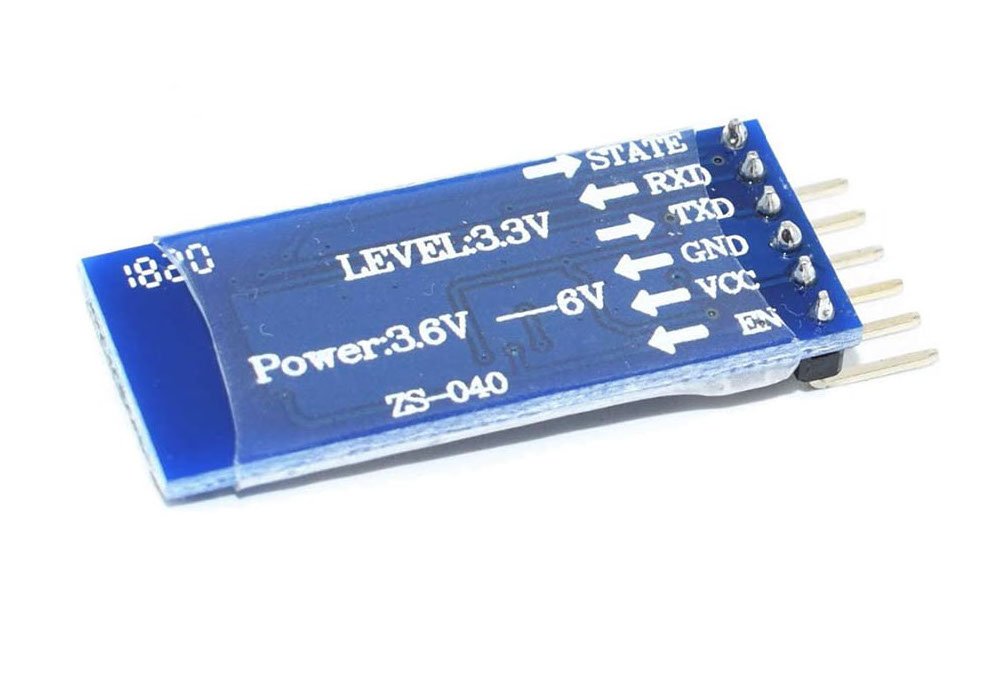
HM-10 Bluetooth module (bottom side)
Required parts
Here is what you’ll need for this project:
1 x Arduino Uno board
1 x ‘HM-10 BLE Bluetooth 4.0 module’ (see bottom of the page for the exact model used in this tutorial)
1 x Breadboard
1 x 220 Ohm resistor
6 x male-to-male jumper wires
1 x LED light
1 x iPhone or Android phone
A smartphone app to communicate via Bluetooth (eg. Bluetooth Terminal)
Arduino IDE software
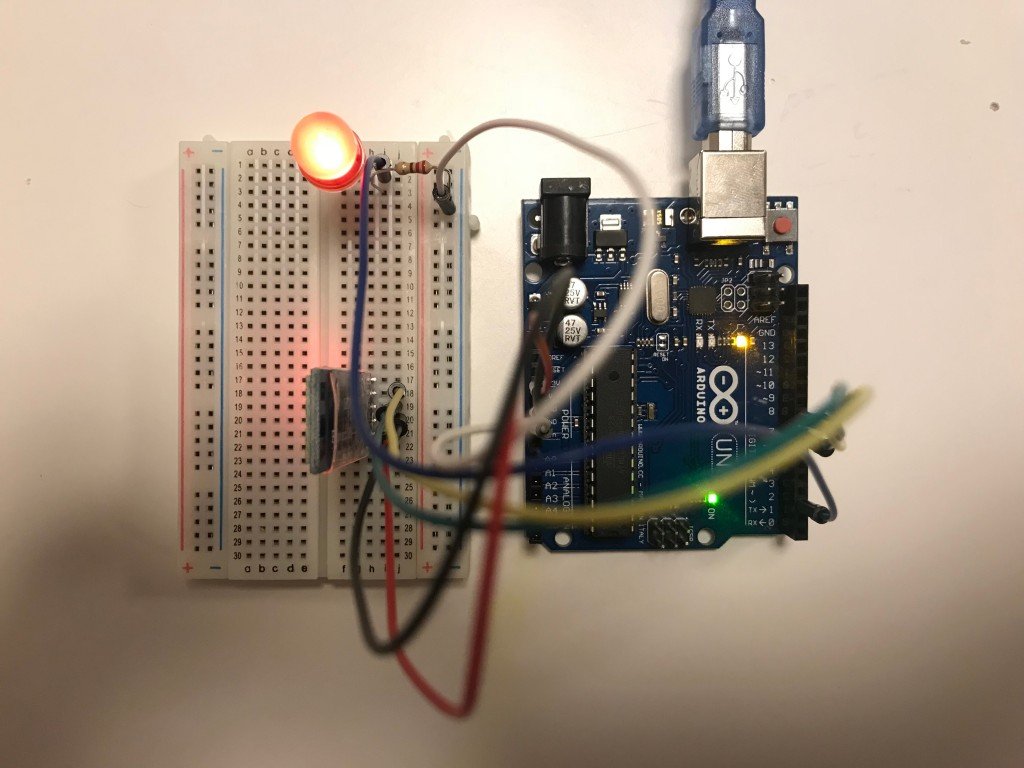
Wiring schematic
Wire up the project using jumper wires by following these instructions and the circuit diagram shown below.
Connect VCC on Bluetooth module to 3.3V pin on Arduino Uno via a breadboard
Connect GND on Bluetooth module to GND on Arduino via the breadboard
Connect TXD on Bluetooth module to digital pin 7 on Arduino via the breadboard
Connect RXD on Bluetooth module to digital pin 8 on Arduino via the breadboard
Connect the long pin from the LED on the breadboard to digital pin 2 on Arduino via a 220 Ohm resistor
Connect the short pin from the LED on the breadboard to GND on the Arduino
Note: The STATE and EN pins on the Bluetooth module do not need to be connected to anything in this project.

Images


Arduino code - example 1
Create a new sketch in the Arduino IDE software and use the following code. Then upload the sketch to your Arduino board. The code on the Arduino checks if a Bluetooth connection exists and then reads commands sent from the smartphone app. In this example, we will send a “1” message from the app to turn the LED on and a “0” message to turn it off. Scroll down the page for the second example code which can receive a range of different string commands eg. “on”, “off”, etc.
Connecting to the app
To connect your Android or iOS mobile device to the Arduino you will need to download a free app (or you could also make your own app) that can connect to the HM-10 Bluetooth module and send commands. You can search your device’s app store to find a free app that will work for this project but for this example we will use the free Bluetooth Terminal app on iOS.
Tip: If you search the iOS App Store or Google Play app store using the keywords “bluetooth arduino” or “bluetooth hm-10” you should be able to find a suitable app.
The steps below are for the Bluetooth Terminal app on iOS but will be similar for other apps on other devices:
Step 1 - Open the app and connect to the Bluetooth module (in this case it is called CC41-A but the name will vary depending on the model you have).

Step 2 - Tap ‘Select characteristic’ and then select the Bluetooth device name eg. “FFE1” (at the bottom of the list).

Step 3 - Select Decimal.
Step 4 - Using the on-screen keypad, you can enter different decimal values. Enter 1 and tap the Send button. The LED light should turn on. Enter 0 and tap the Send button. The LED should then turn off. If you don’t see anything happen, click Tools > Serial Monitor in the Arduino IDE and then set the baud date to 9600 bauds. Check if any input is being received and displayed in the serial monitor when you send the 0 or 1 commands to the Arduino from the app.

Arduino code - example 2 (string commands)
In the example code above, we were limited to sending 0 or 1 commands only. In this example code, the Arduino can receive string commands from a smartphone app via Bluetooth. This means we can specify a wider range of different commands eg “on” and “off” to control an LED light, or specify different colours for an RGB LED, or “forward”, “backward”, “left”, and “right” to control a car. This code makes the Arduino wait for a Bluetooth connection. Once a Bluetooth connection is established, it will receive commands and check if it has received a certain string command.
Where to from here?
You can use Bluetooth to control other projects such as a robot or car. You can also try receiving data from the Arduino – eg. send sensor readings to your smartphone.
Which Bluetooth module should I use?
There are several different Bluetooth modules that should work with this tutorial. The one used in this project was purchased on eBay and is called “HM-10 CC2540 CC2541 BLE Bluetooth 4.0 Wireless Module“.