Working with GET and POST request parameters
Build web apps with NodeJS & Express
🕑 This lesson will take about 30 minutes
In this lesson, you will learn how to extract parameters from GET and POST requests. Parameters can be used to send data from the client to the server in a request. In GET requests, parameters are often used to filter information or request specific information, and in POST requests they are often used to submit data from a form on a web page.
Working with parameters from GET requests
In GET requests, dynamic parameters (also known as “query strings” or “URL parameters”) can be included in the URL requested. In our server-side code, we can extract the data values from these parameters and use them to make decisions and send a custom response to the user.
For example, if we were building a social networking website and the user requests a URL such as “www.mywebsite.com/user/bob” , we can extract the username parameter from the URL (in this case, “bob”), fetch Bob’s profile data from a database, and then display Bob’s profile page to the user.
GET request parameters can come be formatted in different ways, for example, “www.mywebsite.com/search?query=cats&sort=newest” - in this example, there are multiple parameters formatted as key-value pairs - “query” and “sort” are keys, and “cats” and “newest” are values for these keys. This type of request could be used to search a website for results about cats and sort the results from newest to oldest. When using key-value pairs as parameters in a GET request, they follow a ? character at the end of the URL, an = character is placed between each key and value, and if there is more than one key-value pair, they are separated by an & character.
Let’s try extracting a parameter from a GET request. In this example, we will have a username parameter in a URL eg. “www.mywebsite.com/user/bob”. In our server-side code, we will extract the value for the username parameter (eg. “bob”) from the URL requested and display the username value in a greeting back to the user eg. “Welcome back, bob”.
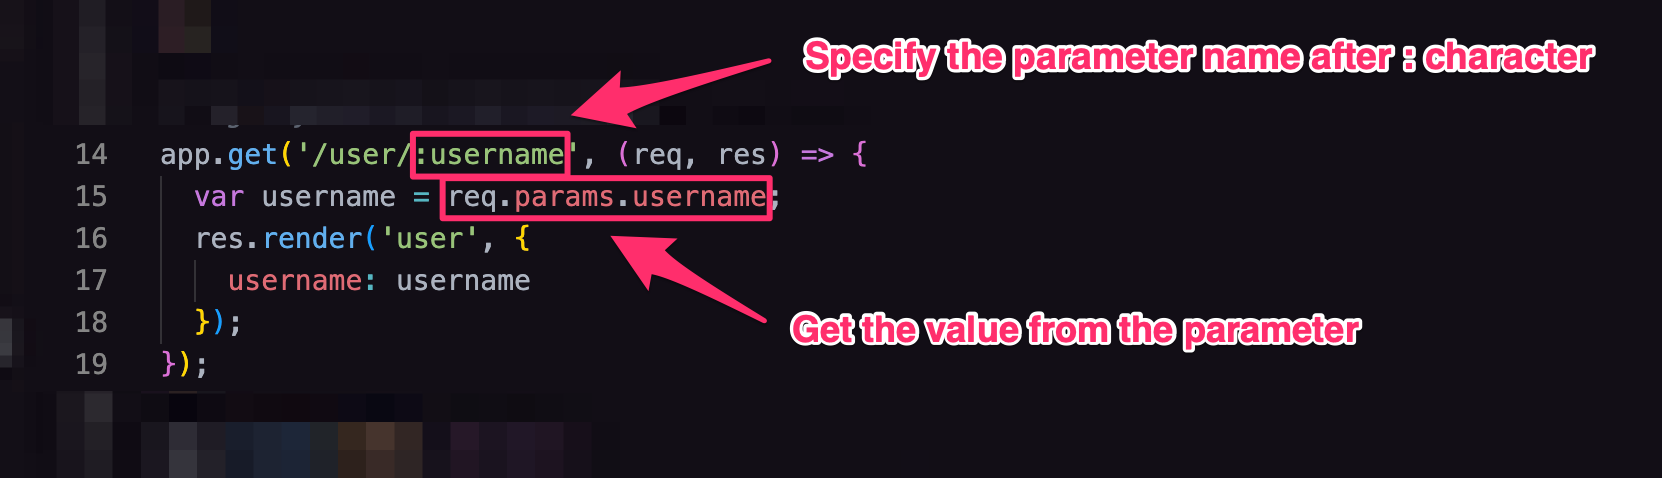
Firstly, create a new route in your index.js file (server-side code) using the sample code shown below (make sure your routes code is always above the app.listen() line of code). To specify a parameter in the route, we place the parameter name after a : (colon character) in the route URL. We can then get the data value from that named parameter using req.params. (followed by the parameter name).
// eg. mywebsite.com/user/bob
app.get('/user/:username', function (req, res) {
var username = req.params.username;
res.render('user', {
username: username
});
})
Your index.js file code should now look like this:
If we take a closer look at the code we added in this new route, we can see that there is a parameter specified in the URL with the name 'username' and that we can extract the value from the parameter provided in the requested URL requested and store it in a variable by using the line of code req.params.username (this gets the value from the parameter called username in the URL). Note that we can have multiple parameters in a URL (each parameter name must come after a : character)
To specify a parameter in a URL, we need to start it off with a : (colon) character. We can also add more than one parameter. For example, '/user/:username/album/:album_id/photo/:photo_id' (where there are three parameters - username, album_id and photo_id - we could do this if we wanted to view a specific photo in a specific photo album for a specific user, we would then just also need to use the values provided for each parameter eg. req.params.album_id or req.params.photo_id).
Now, as we have used the res.render() function and specified a template called 'user', we will need to create a new template file in the views folder called user.ejs that will receive the username variable when the page is rendered and display it on the page in a greeting eg. "Welcome back, [username]".
Add the following code to a new file called “user.ejs” in the views directory/folder.
<html>
<head>
<title>Profile</title>
</head>
<body>
<h1>Welcome back, <%= username %>! </h1>
</body>
</html>
Here is the full code for the views/user.ejs file:
The <%= and %> characters are used to enclose the name of the variable of which we want to display the value of. For example <%= username %> will display the value stored in the username variable in the route we made earlier.
To test your code, run the server (run node index.js in the Terminal) and then navigate to http://localhost:3000/user/bob . You should see the web page displayed with the greeting “Welcome back, bob!”. Change the value for the username parameter in the URL and you should see that value in the greeting.

Working with parameters from POST requests (submitting form data)
Now, let's look at how to handle data from a POST request (data entered in a form on a web page and that is not visible in the URL). For this example, we will create a search form that will display back to the user their search query. This could be extended by searching a database and then displaying a list of results that match the user's query.
Create a new template file called search.ejs in the views directory. Add the following code to the search.ejs file.
In the code above, there is a form containing a text input (text box) with the name “query” and a submit button (to submit the form data). The POST request method is used to submit the form data and a new route called “/search” will be used to handle the request. Below the form code is a JavaScript if statement enclosed within <% and %> characters (JavaScript statements can go between these characters in an EJS template).
The if statement is used to check if a variable called “searchQuery” exists, and if so, display the variable's contents. When the user visits the search page, they will just see the search text input box. The text input box has the name "query". When the form is submitted, the “/search” route in the server-side code will get the value from the “query” parameter, store it in a variable called searchQuery and then display the contents of the variable back to the user (below the search box) - this will only be displayed to the user when the variable has been given a value. Note: each input in a form should have a unique name.
Now, go back to your index.js (server-side code) file. We are going to add two routes:
an app.get() route that will display the Search page, and
an app.post() route that will get data from the search form and display some kind of result on the Search page
First, we will use the app.get() function to create a route that will be responsible for displaying the search page (before the user submits a query using the form). Add the following code to the index.js file, making sure you add it above the app.listen() line.
// eg. mywebsite.com/search
app.get('/search', (req, res) => {
res.render('search', {});
});
To be able to extract data from POST requests, we will need to use the body-parser package. Add the following code to near the top of your index.js file but make sure it is below the const app = express(); line:
const bodyParser = require('body-parser');
app.use(bodyParser.json());
app.use(bodyParser.urlencoded({ extended: true }));
Next, we will add code that will handle the submitted form data when the user enters their search query. This time, we will be adding code to handle a POST request (instead of a GET request), so we will use the app.post() function. Add the following code to the index.js file, making sure you add it above the app.listen() line.
app.post('/search', (req, res) => {
var searchQuery = req.body.query;
res.render('search', {
searchQuery: searchQuery
});
});
Here is the full code for the index.js (server-side code) file so far:
The req.body.query line of code will grab the data that has been entered into the text input box (that has the name "query" in our template file) and then store the data in a variable called searchQuery. If you have more than one text input (or another type of input) in a form, then refer to the names of each input eg. req.body.username or req.body.email_address . The searchQuery variable will then be used in the 'searche.ejs' template to display the user’s query on the page.
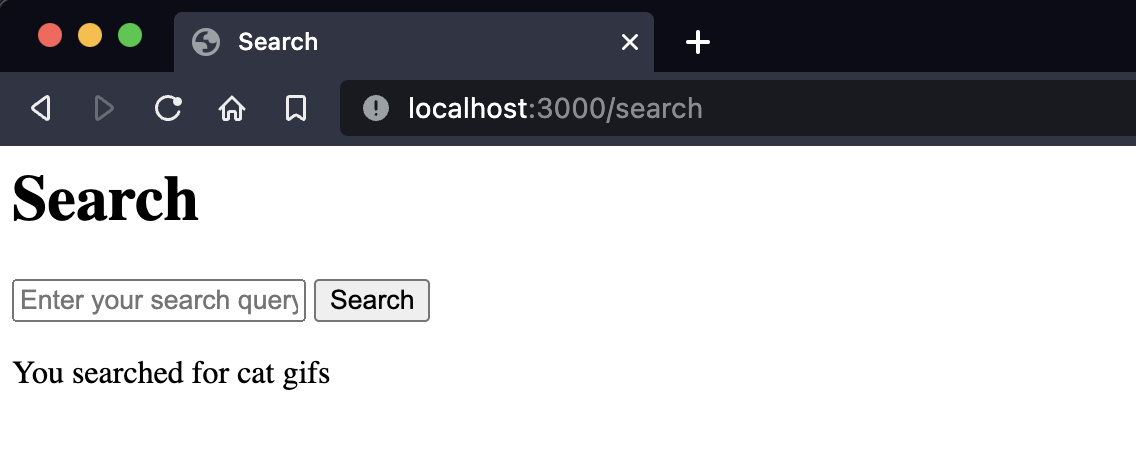
Restart the app and open it in a new tab or window. Go to your /search page (eg. http://localhost:3000/search ), type in a query and click the Search button. You should now see the data displayed back on the page. When you visited the search page, you made a GET request and the app.get(/search) route was executed. When you clicked on Search, a POST request was made and the app.post(/search) route was executed. This route could render a completely different template if you like (to display a different page), however, in this example, we rendered the search page again and just checked if the searchQuery variable exists before attempting to display any data stored in it from the search query on the same page.
This is what will be displayed to the user after they enter their search query in the text box.
This is a basic example of how to add a route for a POST request, fetch data from a POST request and display it. A POST request could be used to insert data into a database, query an API or database, or display specific data back to the user.
Next lesson: What is an API?