Measure soil moisture with an Arduino
Arduino Uno tutorials
🕑 This lesson will take about 15 minutes
In this lesson, you will learn how to use a soil moisture sensor to keep track of the amount of water present in soil so we can know when the soil is dry and plants need watering. This sensor has a range of applications such as agricultural science and horticulture including irrigation planning, and climate research and environmental science.
We will use jumper wires to connect the soil moisture sensor to the Arduino. We can connect the sensor directly to the Arduino using jumper wires but we can also connect it via a breadboard if we wish to connect more things.
Required parts
1 x Arduino Uno board
1 x Soil moisture sensor
3 x male-to-female jumper wires (or 3 male-to-male wires if using breadboard)
Wiring schematic
Follow these steps and refer to the wiring schematic shown below.
Using a male-to-female jumper wire, connect the VCC pin on the moisture sensor to digital pin 7 on the Arduino Uno
Connect the GND pin on the sensor to GND on the Arduino Uno.
Connect the SIG pin on the sensor to analog pin A0 on the Arduino.
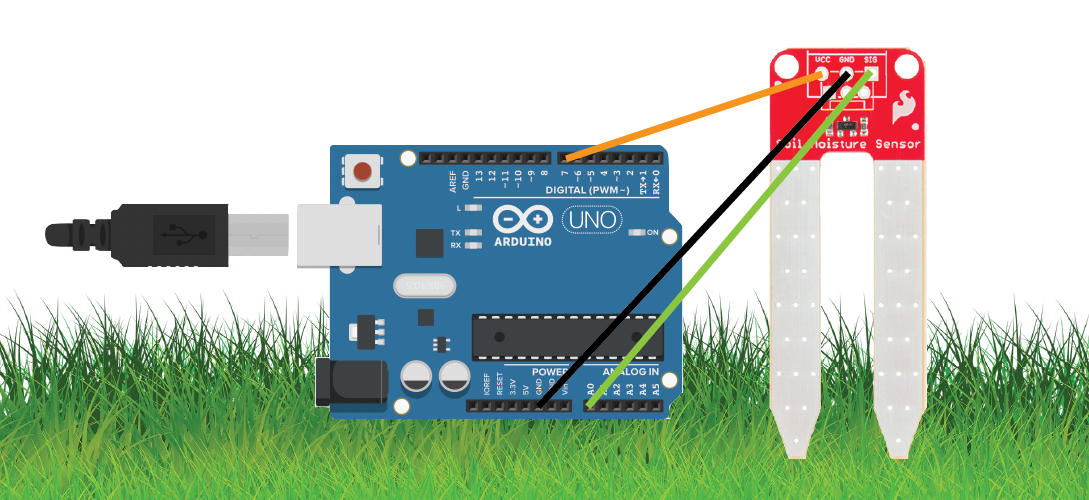
Place the two prongs on the other end of the sensor in some soil and upload the following code to the Arduino using the Arduino IDE software.
Once the code is uploaded and the Arduino is still connected to the computer via USB cable, open up the Serial Monitor in the Arduino software (click Tools > Serial Monitor) to test the sensor. Make sure the baud rate is set to 9600 in the Serial Monitor window. Add some water to the soil to see the moisture values increase.
The code
Upload the following code to the Arduino Uno and test the sensor using the Serial Monitor to read the moisture level values coming from the sensor.