Sending responses
Build web apps with NodeJS & Express
🕑 This lesson will take about 20 minutes
Different types of functions we can use to send a response to the client when a request has been made include:
res.send() - sends a simple text-based message (eg. “Hello World!”).
res.sendStatus() - sends a HTTP status code (eg. 200 for OK, 500 for Internal Server Error, etc).
res.status() - can be used in conjunction with the .send() method to send a status code and a message with it, or in conjunction with .json() method to send a status code some JSON data with it.
res.sendFile() - sends a file for display in the browser (eg. a web page, an image, video, document, etc.)
res.download() - sends a file for the browser to download (eg. an image, video, document, etc.)
res.render() - renders a web page containing content from the server or a database using a template file and view engine.
We will look at how to use each of these different functions to send responses to the client.
The res.send() function
In the previous lesson, we looked at how to add routes to our Express server code and send simple responses to the client using the res.send() function, for example:
app.get('/', (req, res) => {
res.send('Hello World!');
});
Here is the sample code for our Express server so far, which has two routes - one is to handle GET requests to the ‘/’ path on the server, and the other is to handle GET requests to the ‘/about’ path on the server. Both of these routes use the res.send() function to send a simple text-based message as a response to the client.
However, there are other types of responses we can send to the client. The res.send() function is useful for testing but most of the time we are not going to use this function because we will need to send more complex data such as a file or dynamic web page content. We can use other response types to send back status codes (eg. for error messages), JSON data (eg. if we are creating an API), files to display in the browser or download to the user’s computer (such as images, PDF documents, videos, etc.) or to render a web page containing content from the server or a database using template files.
The res.sendStatus() function
The res.sendStatus() function can be used to send an HTTP status code. There are several different HTTP response status codes that can be used to communicate when things are OK or when things have gone wrong after a request has been made by using a three-digit code. Status codes include 200 (“OK” - when everything is functioning normally), 404 (“Not Found” - when a page or file requested by the client cannot be found), and 500 (“Internal Server Error” - indicates a problem with the server) but there are many more.
In the example code below, an HTTP response status code of 500 is sent to the client (in the app.get(‘/’) route) when a GET request is made for the ‘/’ path from the client.
If you save this code, run the server (using the terminal command node index.js ), and navigate to http://localhost:3000 in your browser (or refresh the page if it is still open), you should see “Internal Server Error”. Additionally, if you open your browser’s console (in Chrome, click the menu button and then click More Tools > Developer Tools > and then select the Console tab) you will see details about the error there. As no message has been sent with the status code, the web page does not display any content, just the “Internal Server Error” message.

Using res.status() and res.send() functions
We can also use the res.status() function to send an HTTP status code that will be displayed in the console, but also use this in conjunction with .send() to send a message along with it that will be displayed on the page. As you can see in the example code below, the res.status() function is used to send a 500 status code and chain along a “Something went wrong” message with it using the .send() function
When we test this code, we can see the “Something went wrong” message displayed in the browser window but if we check the console we will also see the 500 status code message there.

We can also use the res.status() and the .json() method to send a status code along with some JSON data. This is very useful if you would like to create an API where clients can make requests and your server sends back a response containing JSON data from the server or from a database.
In the example below, we will send a 200 status code (which means “OK”) and some JSON data containing a message.
Save your code, run the server and refresh the page in the browser. You should see some JSON data in the browser window, as shown in the example below. Note that if you are sending an HTTP response status code of 200, it will not be displayed in the console. That’s because if the response code is 200 then everything is OK, no problems occurred, and there is no need to display the status code in the console. The console will only display other status code messages such as errors and will not display a status code of 200 “OK” (you can change the status code in the res.status() function to another code, such as 500, to test this out).

Note that you can also send JSON data that is contained in a separate variable, as shown in the example below. The same goes for sending a response using the re.send() function - we can send a message contained in an existing variable eg. res.send(myVariable);
Using the res.sendFile() function
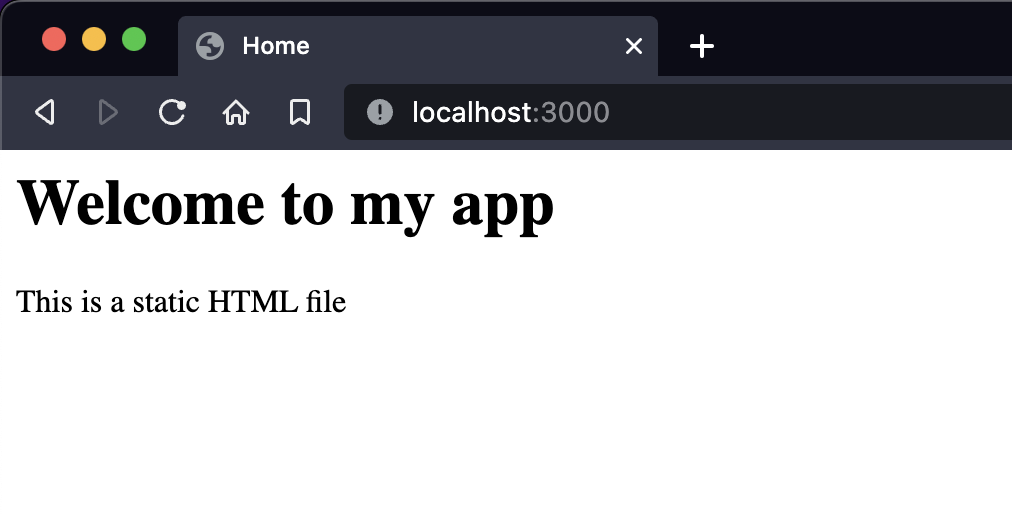
The res.sendFile() function can be used to send a file for display in the browser (eg. a web page, an image, video, document, etc.). First, create a new folder/directory in your app folder. In this example, we will create a new folder called ‘public’. We will create a new HTML file in this new folder called ‘index.html’. This HTML file will be a static file (a file that does not change when your application is running). It will be a simple web page that displays the same content to all users and that content does not vary depending on the user or request.

Add some code to the ‘index.html’ file to display some content to the user. Here is an example of some HTML code that will display a large heading and some text to the user.
Now go back to the ‘index.js’ file and modify the code so that the res.sendFile() function is called. When calling the function, you will need to specify the file name (index.html) and the directory the file is stored in (public), as shown in the example code below.
Now run the server again and refresh the app in your browser. The content in the HTML file will be displayed in the browser. Remember, the file doesn’t have to be a HTML file - you could send an image, video, PDF file or other type of file for display in the browser.
Using the res.download() function
The res.download() function sends a file for the browser to download (eg. an image, video, document, etc.) rather than displaying the file within the browser window. In the example below, an image file (‘photo.jpg’) is stored in the ‘public’ folder/directory. The file name and the directory the file is stored in are specified when the res.download() function is called, as shown in the example below. If you save this code, run the server again, and navigate to http://localhost:3000 in your browser, then the file should start downloading.
Using the res.render() function
The res.render() function renders a web page that can contain dynamic content including content from the server, an API, or a database, using a template file and view engine. The way that this works, is that you firstly create a template file that contains the structure or layout of a web page and its theme (eg. header, navigation bar, content area, footer) and some static content (eg. images, text) and then specify where dynamic content (coming from the server, an API or a database) will be displayed. This dynamic content can vary depending on the user, the request made by the user, or the response given by the server. In the server code, you would then specify which template file to use for the request and the data that will be passed through to the web page to be displayed where specified in the template file.
A view engine (also known as a template engine or rendering engine) will need to be installed in your app to use the res.render() function. Examples of template engines include EJS and Pug. In the next lesson, we will look at how to use the EJS template engine to render template files.
Next lesson: Using a view engine to render template files